Introduction
Arch Linux is one of the many Linux distributions offered, typically targeted towards Linux enthusiasts.
This guide is targeted towards people who have Arch Linux installed on their machines. It assumes basic Linux knowledge and familiarity with a command line interface.
More specifically, it aims to show the steps to recover an installed Arch Linux environment, in the event where something catastrophic has happened to the installation and the user can no longer boot to it.
This may happen in a variety of situations. These instructions address the case when the bootloader for Arch Linux is not accessible, rendering the installation inaccessible as a whole.
Typically, this will happen accidentally through software updates or updates from other operating systems (Windows, macOS) overwriting critical data.
Danger (Pre-Recovery Caution)
These instructions have the potential to severely damage your system and stored data, if done incorrectly.
Before following these steps, ensure your system data is backed up beforehand.
Proceed to following these steps at your own discretion!
Preparing a USB Drive
Before we access our machine with the arch-chroot utility, we need to prepare a USB drive to use.
Warning (USB Warning)
Use an empty USB drive, or one whose files are no longer required.
The USB burning process will wipe the entire USB that you choose, so ensure you back up data before proceeding.
-
Download the Arch Linux ISO. Grab the
.isofrom a mirror link on this page and save it to your computer. -
Install a USB burner. Download and install either Rufus or Ventoy. This guide demonstrates Rufus.
-
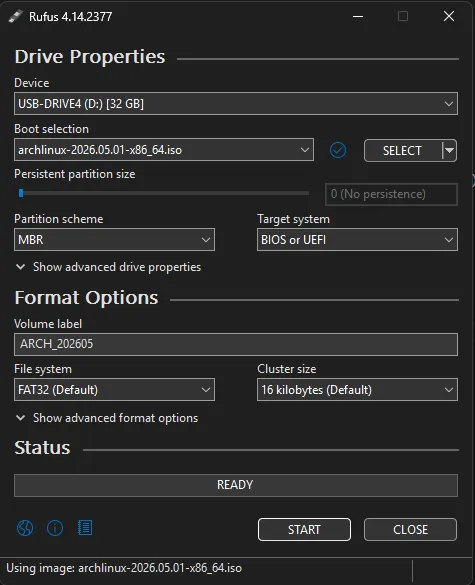
Configure Rufus. Open Rufus and set the following:
- Device: select your USB drive from the dropdown
- Boot Selection: point to the downloaded Arch
.isofile - Leave all other options at their default values
The selected Rufus presets should look like this:
-
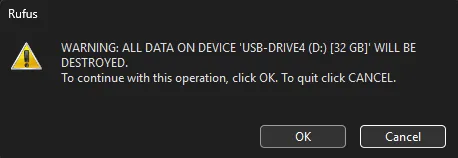
Burn the ISO. Press START. Rufus will warn that all data on the USB drive will be deleted. Press confirm to proceed.
-
Eject the USB. Once Rufus has finished writing, safely eject the drive.
Booting the USB Drive
Now that you have burned the Arch Linux live environment onto a USB drive, plug the USB into the computer you want to recover.
-
Boot into BIOS/UEFI. This step depends on your computer manufacturer. Please consult their documentation for the exact key sequence.
Tip (Booting to BIOS/UEFI)
Typically, this involves pressing one of the F2, F12, or Del keys while the computer is starting up. Different manufacturers have entirely different boot sequences, so search up instructions for your specific computer model.
-
Set the USB as the top boot priority. In BIOS/UEFI, move the USB drive to the top of the boot order so the computer boots from it instead of the installed operating system. Consult your manufacturer’s documentation for this step.
-
Disable Secure Boot (if applicable). For computers with Secure Boot enabled, temporarily turn off this option before booting.
-
Reboot. Your computer should now boot into the Arch Linux live environment, where you can identify drives and recover the bootloader.
Detecting Drives
Once you are dropped into the Arch Linux command line, you are ready to identify which drive holds your installation.
- List all disks and partitions using the two commands below:
> fdisk -l    Disk /dev/nvme0n1: 953.87 GiB, 1024209543168 bytes, 2000409264 sectors    Disk model: **************    Units: sectors of 1 * 512 = 512 bytes    Sector size (logical/physical): 512 bytes / 512 bytes    I/O size (minimum/optimal): 512 bytes / 512 bytes    Disklabel type: gpt    Disk identifier: **************
Device Start End Sectors Size Type /dev/nvme0n1p1 2048 206847 204800 100M EFI System /dev/nvme0n1p2 206848 239615 32768 16M Microsoft reserved /dev/nvme0n1p3 239616 2336767 2097152 1G Linux filesystem /dev/nvme0n1p4 2336768 10725375 8388608 4G Linux filesystem /dev/nvme0n1p5 10725376 717039615 706314240 336.8G Linux filesystem /dev/nvme0n1p6 717039616 1998911487 1281871872 611.2G Microsoft basic data /dev/nvme0n1p7 1998911488 2000406527 1495040 730M Windows recovery environment> lsblk NAME MAJ:MIN RM SIZE RO TYPE MOUNTPOINTS nvme0n1 259:0 0 953.9G 0 disk ├─nvme0n1p1 259:1 0 100M 0 part ├─nvme0n1p2 259:2 0 16M 0 part ├─nvme0n1p3 259:3 0 1G 0 part /boot ├─nvme0n1p4 259:4 0 4G 0 part ├─nvme0n1p5 259:5 0 336.8G 0 part / ├─nvme0n1p6 259:6 0 611.2G 0 part └─nvme0n1p7 259:7 0 730M 0 part-
Identify your key partitions. Based on the output above:
- The EFI system partition (100M, type “EFI System”) →
dev/nvme0n1p1 - The root partition (large Linux filesystem, mounted at
/) →/dev/nvme0n1p5
Note these two partition paths, as you will need them in the next section.
- The EFI system partition (100M, type “EFI System”) →
Chroot into Disk
Now that we have our partitions identified, we can set everything up for arch-chroot.
- Mount the root partition to
/mnt:
> mount /dev/YOUR_ROOT_PARTITION /mnt- Mount the EFI partition to
/mnt/boot, creating the directory automatically with--mkdir:
> mount --mkdir /dev/YOUR_EFI_PARTITION /mnt/boot- Enter the chroot environment. Run the
arch-chrootcommand to drop into a root shell, as if you were root inside your installed Arch Linux system:
> arch-chroot /mntReconfiguring Bootloader
Now that we have full access to our installed Arch Linux filesystem, we can recover the bootloader.
This step varies depending on what bootloader you have installed. This guide demonstrates reinstalling the rEFInd bootloader, though other options include GRUB and systemd-boot.
- Run the rEFInd installer. If you previously installed rEFInd, the command should already be present on your chrooted system:
> refind-install- Check for errors. Review the command output to ensure there are no issues. If everything looks clean, your bootloader is reinstalled and ready.
Conclusion
Having reconfigured the bootloader, your Arch Linux system should be able to boot with no issues now.
- Exit arch-chroot by running the shutdown command.
- Unplug your USB drive.
- Start your system. If Arch Linux is configured as your only operating system or set to top boot priority, you should boot directly into your installation.
Congratulations! You just recovered Arch Linux with the arch-chroot utility successfully.